| Version 26 (modified by , 11 years ago) ( diff ) |
|---|
Submitting Jobs on Cypress
In this section we will examine how to submit jobs on Cypress using the SLURM resource manager. We’ll begin with the basics and proceed to examples of jobs which employ MPI, OpenMP, and hybrid parallelization schemes.
Quick Start for PBS users
Cypress uses SLURM to schedule jobs and manage resources resources. Full documentation and tutorials for SLURM can be found on the SLURM website at:
http://slurm.schedmd.com/documentation.html
Additionally, those who are familiar with the Torque-PBS manager used on Aries and Sphynx may find the "SLURM Rosetta Stone" particularly useful:
http://slurm.schedmd.com/rosetta.html
Lastly, resource limits on Cypress divided into separate Quality Of Services (QOSs). These are analogous to the queues on Sphynx. You may choose a QOS by using the appropriate script directive in your submission script, e.g.
#SBATCH --qos=long
The default QOS is normal. For a list of which QOS are available and the associated limits please see the about section of this wiki.
Using SLURM on Cypress
Introduction to Managed Cluster Computing
For those who are new to cluster computing and resource management, let's begin with an explanation of what a resource manager is and why it is necessary. Suppose you have a piece of C code that you would like to compile and execute, for example a helloworld program.
#include<stdio.h>

int main(){
             printf("Hello World\n");
             return 0;
}
On your desktop you would open a terminal, compile the code using your favorite c compiler and execute the code. You can do this without worry as you are the only person using your computer and you know what demands are being made on your CPU and memory at the time you run your code. On a cluster, many users must share the available resources equitably and simultaneously. It's the job of the resource manager to choreograph this sharing of resources by accepting a description of your program and the resources it requires, searching the available hardware for resources that meet your requirements, and making sure that no one else is given those resources while you are using them.
Occasionally the manager will be unable to find the resources you need due to usage by other user. In those instances your job will be "queued", that is the manager will wait until the needed resources become available before running your job. This will also occur if the total resources you request for all your jobs exceed the limits set by the cluster administrator. This ensures that all users have equal access to the cluster.
The take home point here is this: in a cluster environment a user submits jobs to a resource manager, which in turn runs an executable(s) for the user. So how do you submit a job request to the resource manager? Job requests take the form of scripts, called job scripts. These scripts contain script directives, which tell the resource manager what resources the executable requires. The user then submits the job script to the scheduler.
The syntax of these script directives is manager specific. For the SLURM resource manager, all script directives begin with "#SBATCH". Let's look at a basic SLURM script requesting one node and one core on which to run our helloworld program.
#!/bin/bash
#SBATCH --job-name=HiWorld    ### Job Name
#SBATCH --output=Hi.out       ### File in which to store job output
#SBATCH --error=Hi.err        ### File in which to store job error messages
#SBATCH --qos=normal          ### Quality of Service (like a queue in PBS)
#SBATCH --time=0-00:01:00     ### Wall clock time limit in Days-HH:MM:SS
#SBATCH --nodes=1             ### Node count required for the job
#SBATCH --ntasks-per-node=1   ### Nuber of tasks to be launched per Node

./helloworld
Notice that the SLURM script begins with #!/bin/bash. This tells the Linux shell what flavor shell interpreter to run. In this example we use BASh (Bourne Again Shell). The choice of interpreter (and subsequent syntax) is up to the user, but every SLURM script should begin this way. This is followed by a collection of #SBATCH script directives telling the manager about the resources needed by our code and where to put the codes output. Lastly, we have the executable we wish the manager to run (note: this script assumes it is located in the same directory as the executable).
With our SLURM script complete, we’re ready to run our program on the cluster. To submit our script to SLURM, we invoke the “sbatch” command. Suppose we saved our script in the file helloworld.srun (the extension is not important). Then our submission would look like:

Our job was successfully submitted and was assigned the job number 6041. We can check the output of our job by examining the contents of our output and error files. Referring back to the helloworld.srun SLURM script, notice the lines
#SBATCH --output=Hi.out       ### File in which to store job output
#SBATCH --error=Hi.err        ### File in which to store job error messages
These specify files in which to store the output written to standard out and standard error, respectively. If our code ran without issue, then the Hi.err file should be empty and the Hi.out file should contain our greeting.

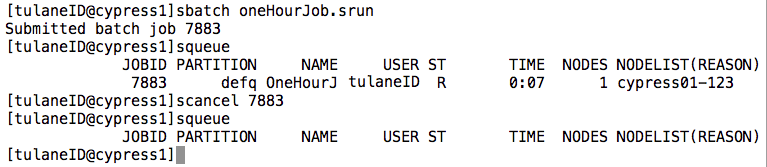
There are two more commands we should familiarize ourselves with before we begin. The first is the “squeue” command. This shows us the list of jobs that have been submitted to SLURM that are either currently running or are in the queue waiting to run. The last is the “scancel” command. This allows us to terminate a job that is currently in the queue. To see these commands in action, let's simulate a one hour job by using the sleep command at the end of a new submission script.
#!/bin/bash
#SBATCH --job-name=OneHourJob ### Job Name
#SBATCH --time=0-00:01:00     ### Wall clock time limit in Days-HH:MM:SS
#SBATCH --nodes=1             ### Node count required for the job
#SBATCH --ntasks-per-node=1   ### Nuber of tasks to be launched per Node

sleep 3600
Notice that we've omitted some of the script directives from our hello world submission script. We will still run on the normal QOS as that's the default on Cypress. However, when no output directives are given SLURM will redirect the output of our executable (including any error messages) to a file labeled with our jobs ID number. This number is assigned upon submission. Let's suppose that the above is stored in a file named oneHourJob.srun and we submit our job using the sbatch command. Then we can check on the progress of our job using squeue and we can cancel the job by executing scancel on the assigned job ID.

Notice that when we run the squeue command, our job status is marked R for running and has been running for 7 seconds. The squeue command also tells us what node our job is being run on, in this case node 123. When running squeue in a research environment you will usually see a long list of users running multiple jobs. To single out your own job you can use the "-u" option flag to specify your user name.
Congratulations, you are ready to begin running jobs on Cypress!
MPI Jobs
Now let’s look at how to run an MPI based job across multiple nodes. SLURM does a nice job of interfacing with the mpirun command to minimize the amount of information the user needs to provide. For instance, SLURM will automatically provide a hostlist and the number of processes based on the script directives provided by the user.
Let’s say that we would like to run an MPI based executable named myMPIexecutable. Let’s further suppose that we wished to run it using a total of 80 MPI processes. Recall that each node of Cypress is equipped with two Intel Xeon 10 core processors. Then a natural way of breaking up our problem would be to run it on four nodes using 20 processes per core. Here we run into the semantics of SLURM. We would ask SLURM for four nodes and 20 “tasks” per node.
#!/bin/bash
#SBATCH --qos=normal
#SBATCH --job-name=MPI_JOB
#SBATCH --time=0-01:00:00
#SBATCH --output=MPIoutput.out
#SBATCH --error=MPIerror.err
#SBATCH --nodes=4
#SBATCH --ntasks-per-node=20

module load intel-psxe/2015-update1

############ THE JOB ITSELF #############################
echo Start Job

echo nodes: $SLURM_JOB_NODELIST
echo job id: $SLURM_JOB_ID
echo Number of tasks: $SLURM_NTASKS

mpirun myMPIexecutable

echo End Job
Again, notice that we did not need to feed any of the usual information to mpirun regarding the number of processes, hostfiles, etc. as this is handled automatically by SLURM. Another thing to note is the loading the intel-psxe (parallel studio) module. This loads the Intel instantiation of MPI including mpirun. If you would like to use OpenMPI then you should load the openmpi/gcc/64/1.8.2-mlnx-ofed2 module or one of the other OpenMPI versions currently available on Cypress. We also take advantage of a couple of SLURMS output environment variables to automate our record keeping. Now, a record of what nodes we ran on, our job ID, and the number of tasks used will be written to the MPIoutput.out file. While this is certainly not necessary, it often pays dividends when errors arise.
OpenMP Jobs
When running OpenMP (OMP) jobs on Cypress, it’s necessary to set your environment variables to reflect the resources you’ve requested. Specifically, you must export the variable OMP_NUM_THREAS so that its value matches the number of cores you have requested from SLURM. This can be accomplished through the use of SLURMS built in export environment variables.
#!/bin/bash
#SBATCH --qos=normal
#SBATCH --job-name=OMP_JOB
#SBATCH --time=1-00:00:00
#SBATCH --nodes=1
#SBATCH --ntasks-per-node=1
#SBATCH --cpus-per-task=20

export OMP_NUM_THREADS=$SLURM_CPUS_PER_TASK

./myOMPexecutable
In the script above we request 20 cores on one node of Cypress (which is all the cores available on any node). As SLURM regards tasks as being analogous to MPI processes, it’s better to use the cpus-per-task directive when employing OpenMP parallelism. Additionally, the SLURM export variable $SLURM_CPUS_PER_TASK stores whatever value we assign to cpus-per-task, and is therefore our candidate for passing to OMP_NUM_THREADS.
Hybrid Jobs
When running MPI/OpenMP hybrid jobs on Cypress, for example,
#!/bin/bash
#SBATCH --qos=normal            # Quality of Service
#SBATCH --job-name=hybridTest   # Job Name
#SBATCH --time=00:10:00         # WallTime
#SBATCH --nodes=2               # Number of Nodes
#SBATCH --ntasks-per-node=2     # Number of tasks (MPI processes)
#SBATCH --cpus-per-task=10      # Number of threads per task (OMP threads)

export OMP_NUM_THREADS=$SLURM_CPUS_PER_TASK

mpirun ./myHybridExecutable
In the script above we request 2 tasks per node and 10 cpus per task, which means 20 cores per node and all the cores available on one node. We request 2 nodes so that we can use 4 MPI processes. Each process can use 10 OpenMP threads.
MIC Native Jobs
There are two Intel Xeon Phi co-processors (MIC) on each node of Cypress. To run your code natively on MIC, make sure you have to compile the code with "-mmic" option. The executable for MIC code cannot run on host CPU. To launch the MIC native executable from host, use "micnativeloadex" command. SLURM jobscript script is, for example,
#!/bin/bash
#SBATCH --qos=normal            # Quality of Service
#SBATCH --job-name=nativeTest   # Job Name
#SBATCH --time=00:10:00         # WallTime
#SBATCH --nodes=1               # Number of Nodes
#SBATCH --ntasks-per-node=1     # Number of tasks (MPI presseces)
#SBATCH --cpus-per-task=1       # Number of processors per task OpenMP threads()
#SBATCH --gres=mic:1            # Number of Co-Processors

micnativeloadex ./myNativeExecutable -e "OMP_NUM_THREADS=100" -d 0 -v
In the script above we request one MIC device that will be device number 0. "micnativeloadex" command launches MIC native executable. "-e "OMP_NUM_THREADS=100"" option to set the number of threads on the MIC device to 100. For more options, see below.
[fuji@cypress01-090 nativeTest]$ micnativeloadex -h

Usage:
micnativeloadex [ -h | -V ] AppName -l -t timeout -p -v -d coprocessor -a "args" -e "environment"
  -a "args" An optional string of command line arguments to pass to
            the remote app.
  -d The (zero based) index of the Intel(R) Xeon Phi(TM) coprocessor to run the app on.
  -e "environment" An optional environment string to pass to the remote app.
      Multiple environment variable may be specified using spaces as separators:
        -e "LD_LIBRARY_PATH=/lib64/ DEBUG=1"
  -h Print this help message
  -l Do not execute the binary on the coprocessor. Instead, list the shared library
     dependency information.
  -p Disable console proxy.
  -t Time to wait for the remote app to finish (in seconds). After the timeout
     is reached the remote app will be terminated.
  -v Enable verbose mode. Note that verbose output will be displayed
     if the remote app terminates abnormally.
  -V Show version and build information
Submitting Interactive Jobs
For those who develop their own codes, we provide the app, idev to make interactive access to a set of compute nodes, in order to quickly compile, run and validate MPI or other applications multiple times in rapid succession.
The app idev, (Interactive DEVelopment)
The idev application creates an interactive development environment from the user's login window. In the idev window the user is connected directly to a compute node from which the user can launch executables directly.
The idev command submits a batch job that creates a copy of the batch environment and then goes to sleep. After the job begins, idev acquires a copy of the batch environment, SSH's to the master node, and then re-creates the batch environment.
How to use idev
On Cypress login nodes (cypress1 or cypress2),
[user@cypress1 ~]$ idev
In default, idev submit a job requesting one node for one hour. It also requests two Intel Phi (MIC) co-processors.
If there is an available node, your job will become active immediately and idev app initiates a ssh session to the computing node. For example:
[fuji@cypress1 ~]$ idev
Requesting 1 node(s)  task(s) to normal queue of defq partition
1 task(s)/node, 20 cpu(s)/task, 2 MIC device(s)/node
Time: 0 (hr) 60 (min).
Submitted batch job 8981
JOBID=8981 begin on cypress01-100
--> Creating interactive terminal session (login) on node cypress01-100.
--> You have 0 (hr) 60 (min).
Last login: Mon Apr 27 14:45:38 2015 from cypress1.cm.cluster
[fuji@cypress01-100 ~]$
Note the prompt, "cypress01-100", in the above session. It is your interactive compute-node prompt. You can load modules, compile codes and test codes.
idev transfers the environmental variables to computing node. Therefore, if you have loaded some modules on the login node, you don't have to load the same module again.
Options
By default only a single node is requested for 60 minutes. However, you can change the limits with command line options, using syntax similar to the request specifications used in a job script.
The syntax is conveniently described in the idev help display:
[fuji@cypress1 ~]$ idev --help
-c|--cpus-per-task=     : Cpus per Task
-N|--nodes=             : Number of Nodes
-n|--ntasks-per-node=   : Number of Tasks per Node
--gres=                 : Number of MIC per Node
-t|--time=              : Wall Time
For example, if you want to use 4 nodes for 4 hours,
[fuji@cypress1 ~]$ idev -N 4 -t 4:00:00
Requesting 4 node(s)  task(s) to normal queue of defq partition
1 task(s)/node, 20 cpu(s)/task, 2 MIC device(s)/node
Time: 04 (hr) 00 (min).
Submitted batch job 8983
JOBID=8983 begin on cypress01-100
--> Creating interactive terminal session (login) on node cypress01-100.
--> You have 04 (hr) 00 (min).
Last login: Mon Apr 27 14:48:45 2015 from cypress1.cm.cluster
[fuji@cypress01-100 ~]$
MIC native run
You can login to MIC device and run native codes. There are two MIC devices on each node, mic0 and mic1.
[fuji@cypress01-100 nativeTest]$ ssh mic0
fuji@cypress01-100-mic0:~$
The prompt, "cypress01-100-mic0" in the above session is your interactive MIC device prompt. Note that you cannot run CPU code there. Therefore, you cannot compile code on device, even compiling for native code. The environmental variables are not set and also module command doesn't work. To run your native executable that uses shared libraries, you have to set environmental variables manually, like
export LD_LIBRARY_PATH=/share/apps/intel_parallel_studio_xe/2015_update1/lib/mic:$LD_LIBRARY_PATH
Questions or Suggestions
If you have ideas for enhancing idev with new features or any questions, please send email to hpcadmin@….
Code Debugging / Profiling
Users are encouraged to debug their codes on a local machine.
GDB is the standard debugger.
http://www.gnu.org/software/gdb/documentation/
For profiler,
https://sourceware.org/binutils/docs/gprof/
'valgrind' can detect memory management and threading bugs.
http://valgrind.org/docs/manual/index.html
All tools above are available on cypress.
Also there are powerful Intel products installed on cypress.
Intel® Inspector XE
Memory and Thread Debugger:
- Debug memory errors like leaks and allocation errors and threading errors like data races and deadlocks.
Setting Environment and Compiling your code
Load module to setup Intel compilers and tools.
[fuji@cypress1 ~]$ module load intel-psxe/2015-update1
Compiling codes with '-g' option to tells the compiler to generate full debugging information in the object file.
[fuji@cypress1 ~]$ icc -g -o mytest mytest.c
Run and Collect Information
Start an interactive job,
[fuji@cypress1 ~]$ idev
To collect information, run the code, for example,
[fuji@cypress1 ~]$ inspxe-cl -collect=mi2 -app-working-dir=$PWD -result-dir=$PWD/results $PWD/mytest
See here for details.
To show results, for example,
[fuji@cypress1 ~]$ inspxe-cl -R problems -r $PWD/results
See here for details.
Intel® Advisor XE
Threading design and prototyping tool for software architects:
- Analyze, design, tune and check your threading design before implementation
- Explore and test threading options without disrupting normal development
- Predict threading errors & performance scaling on systems with more cores
Intel® VTune™ Amplifier 2015
- Intuitive CPU & GPU performance tuning, multi-core scalability, bandwidth and more
- Quick performance insight with advanced data visualization
- Automate regression tests and collect data remotely
Attachments (3)
-
Hi_output.png
(26.9 KB
) - added by 11 years ago.
contents_of_Hi_files
-
sbatch.png
(24.4 KB
) - added by 11 years ago.
sbatch_example
- squeue_scancel2.png (37.4 KB ) - added by 11 years ago.
Download all attachments as: .zip