| Version 1 (modified by , 11 years ago) ( diff ) |
|---|
VisIt
https://wci.llnl.gov/simulation/computer-codes/visit/ Visit Home Page]
VisIt is an Open Source, interactive, scalable, visualization, animation and analysis tool. From Unix, Windows or Mac workstations, users can interactively visualize and analyze data ranging in scale from small (<101 core) desktop-sized projects to large (>105) leadership-class computing facility simulation campaigns. Users can quickly generate visualizations, animate them through time, manipulate them with a variety of operators and mathematical expressions, and save the resulting images and animations for presentations. VisIt contains a rich set of visualization features to enable users to view a wide variety of data including scalar and vector fields defined on two- and three-dimensional (2D and 3D) structured, adaptive and unstructured meshes. Owing to its customizable plugin design, VisIt is capable of visualizing data from over 120 different scientific data formats (see this partial list).
Introduction
Installation
- You can download executables from here.
- You can download the source code and compile it. They provides a script that automatically builds VisIt with all dependent libraries.
Execution Models
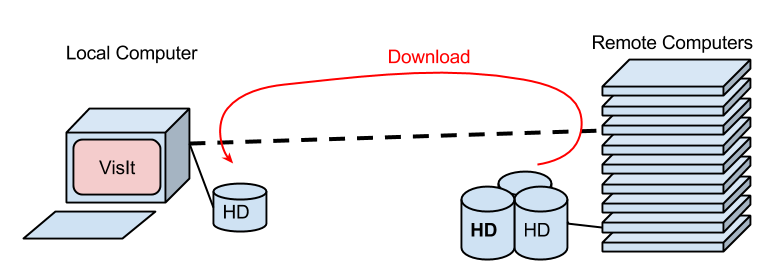
Stand alone
- Basically, you install VisIt on your desktop (laptop) computer in front of you. And visualize data stored in the file system in your computer.
- If you ran simulations on Cypress, you have to download the results data to the local computer with 'scp' or 'rsync' command.

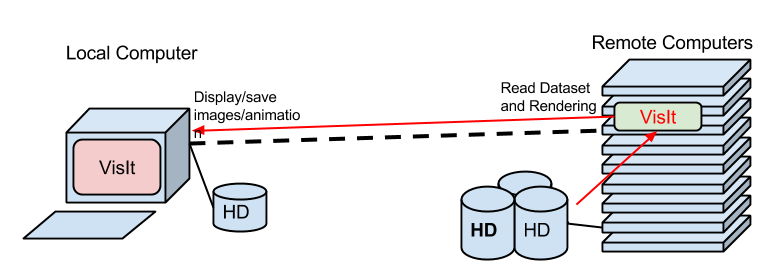
Server - Client System
- VisIt is able to visualize data stored in remote computers over the network.
- You don't have to download the data into the local computer in order to visualize it.
- For example:
- Suppose you ran simulations on Cypress and stored results in the luster file system.
- Run VisIt on the local computer and choose the remote file system when you open a data file.
- VisIt program automatically runs on the remote computer and reads the data file.
- You can work with VisIt as usual on the local computer.
- Also you can use multiple nodes to render objects in parallel, which allow you to visualize a large data set.

- You must have same major version of VisIt on both local and remote computers.
- Run "VisIt" on local machine and go to "Options" -> "Host profiles…"
- Click [New Host] and edit like below:
- Set Host nickname as you like.
- Remote host name must be "cypress1.tulane.edu" or "cypress2.tulane.edu".
- Set Path to visit installation.
- Note that "/share/apps/visit/2.9.2" is where VisIt is installed on cypress. This may be changed in the future. Use "module avail" command to see which version is available on cypress.
- The current version is 2.9.2 so you have to use visit 2.9.* on local machine.
- Set Username. This is your login ID for Cypress.
- Check on Tunnel data connection through SSH
- Click [Apply].

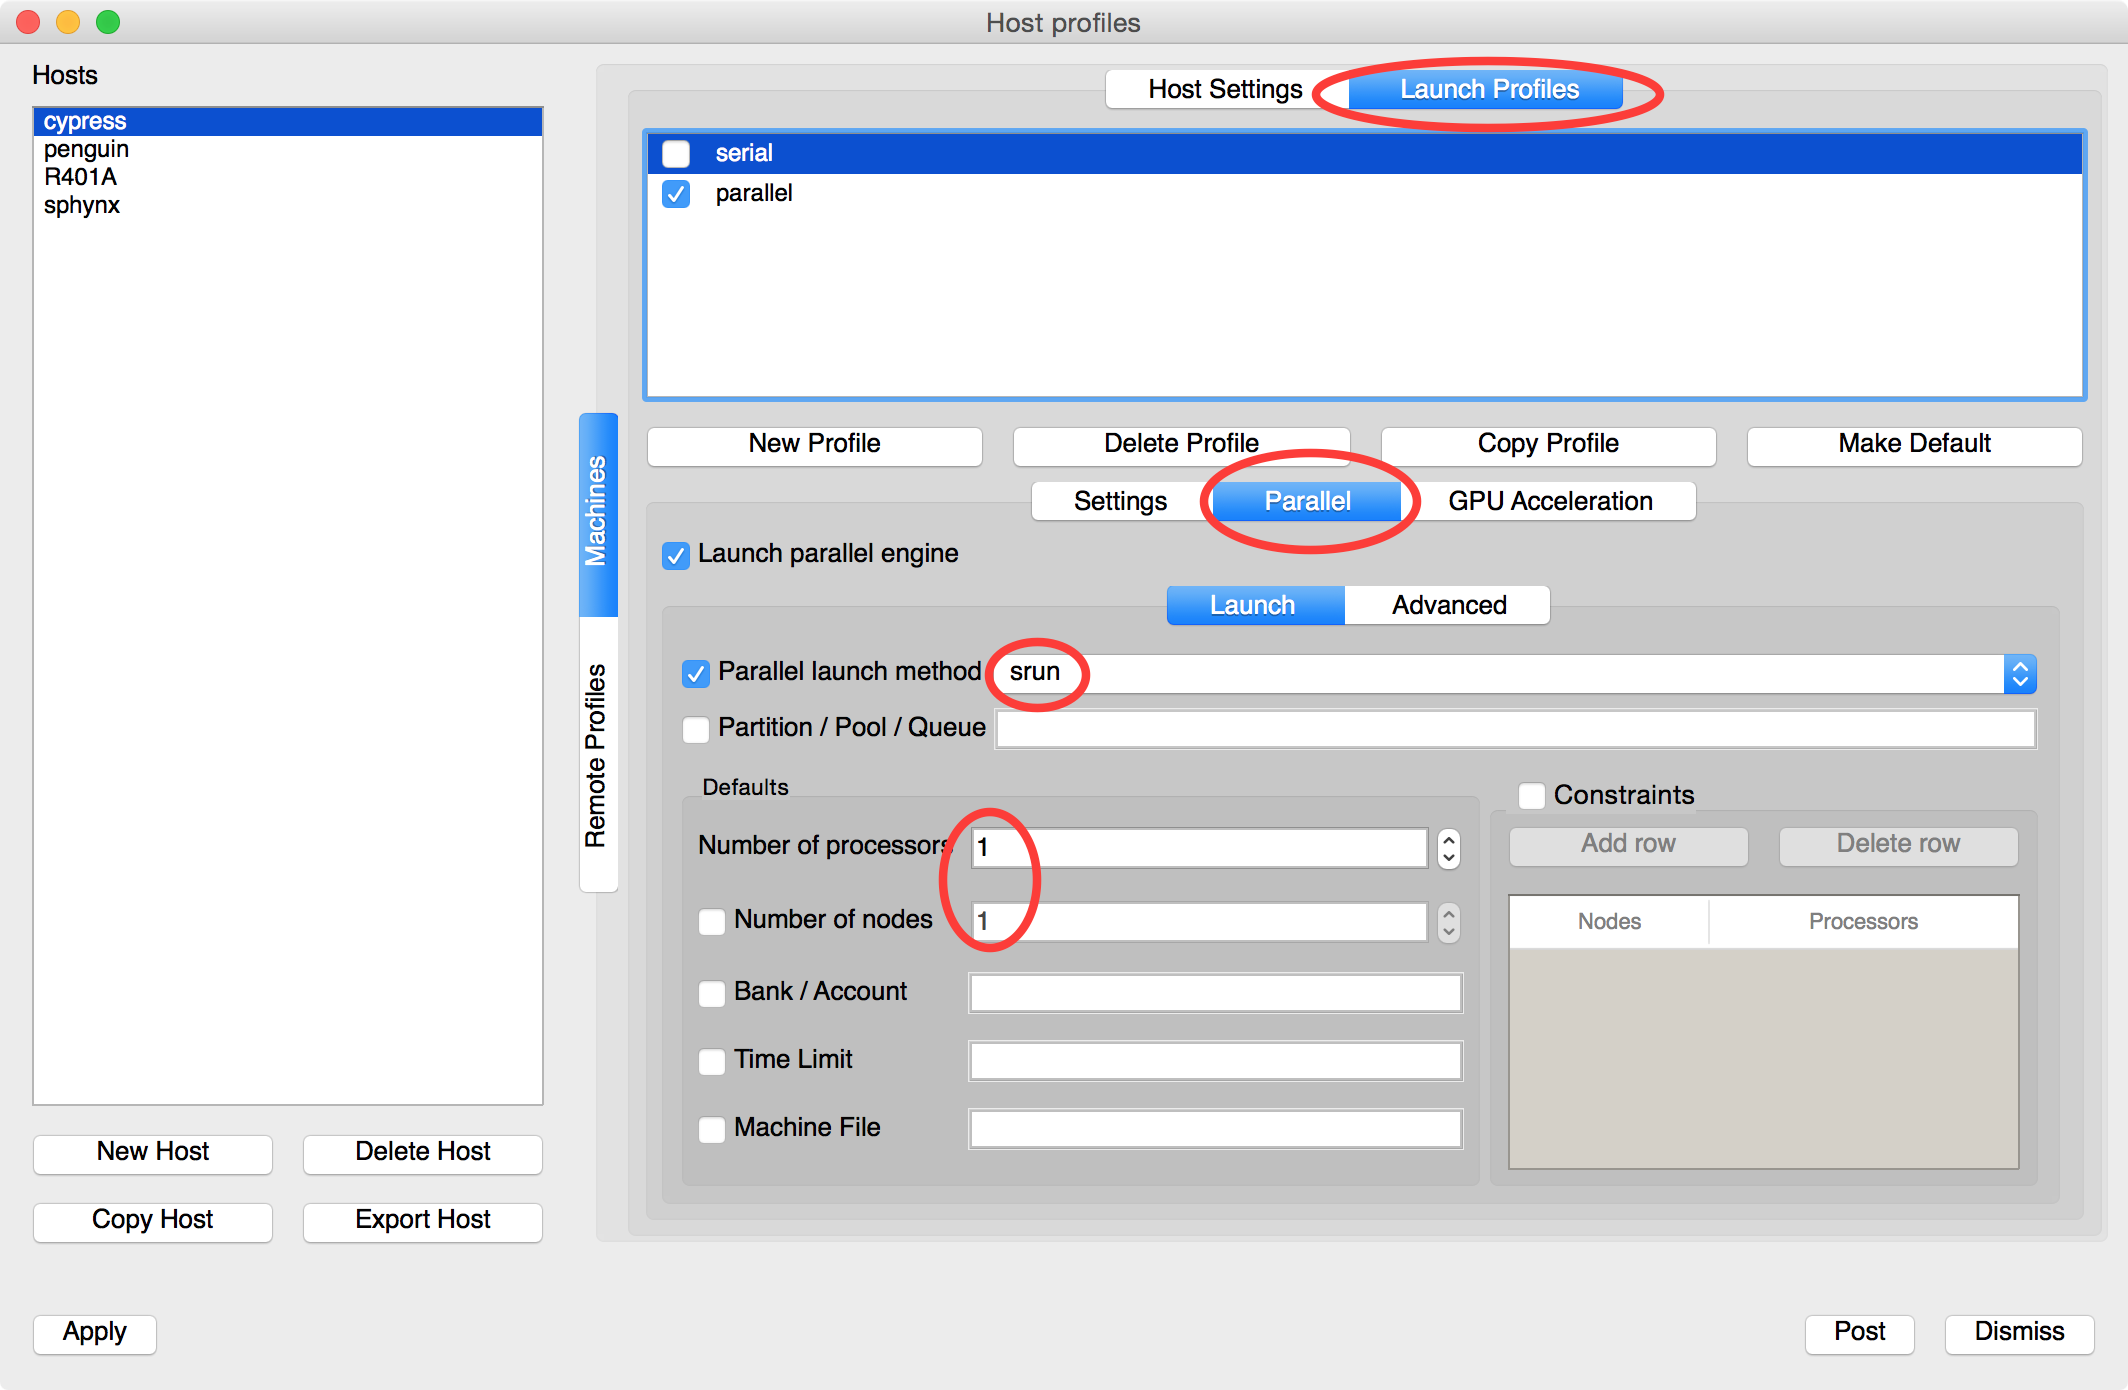
Serial Rendering
This set up VisIt to render objects with one process.
- Select on [Launch Profile] tab.
- Click [New Profile] and select [Setting] tab. Give a name on Profile name.
- Select [Parallel] tab and check Launch parallel engine.
- Select [Launch] tab and set srun on Parallel launch method.
- Set Numbers of processors and nodes 1.
- Click [Apply].

- After setup, do not forget to save : Go to "Options" -> "Save Settings".
- Once setup and saved, you don't have do this again.
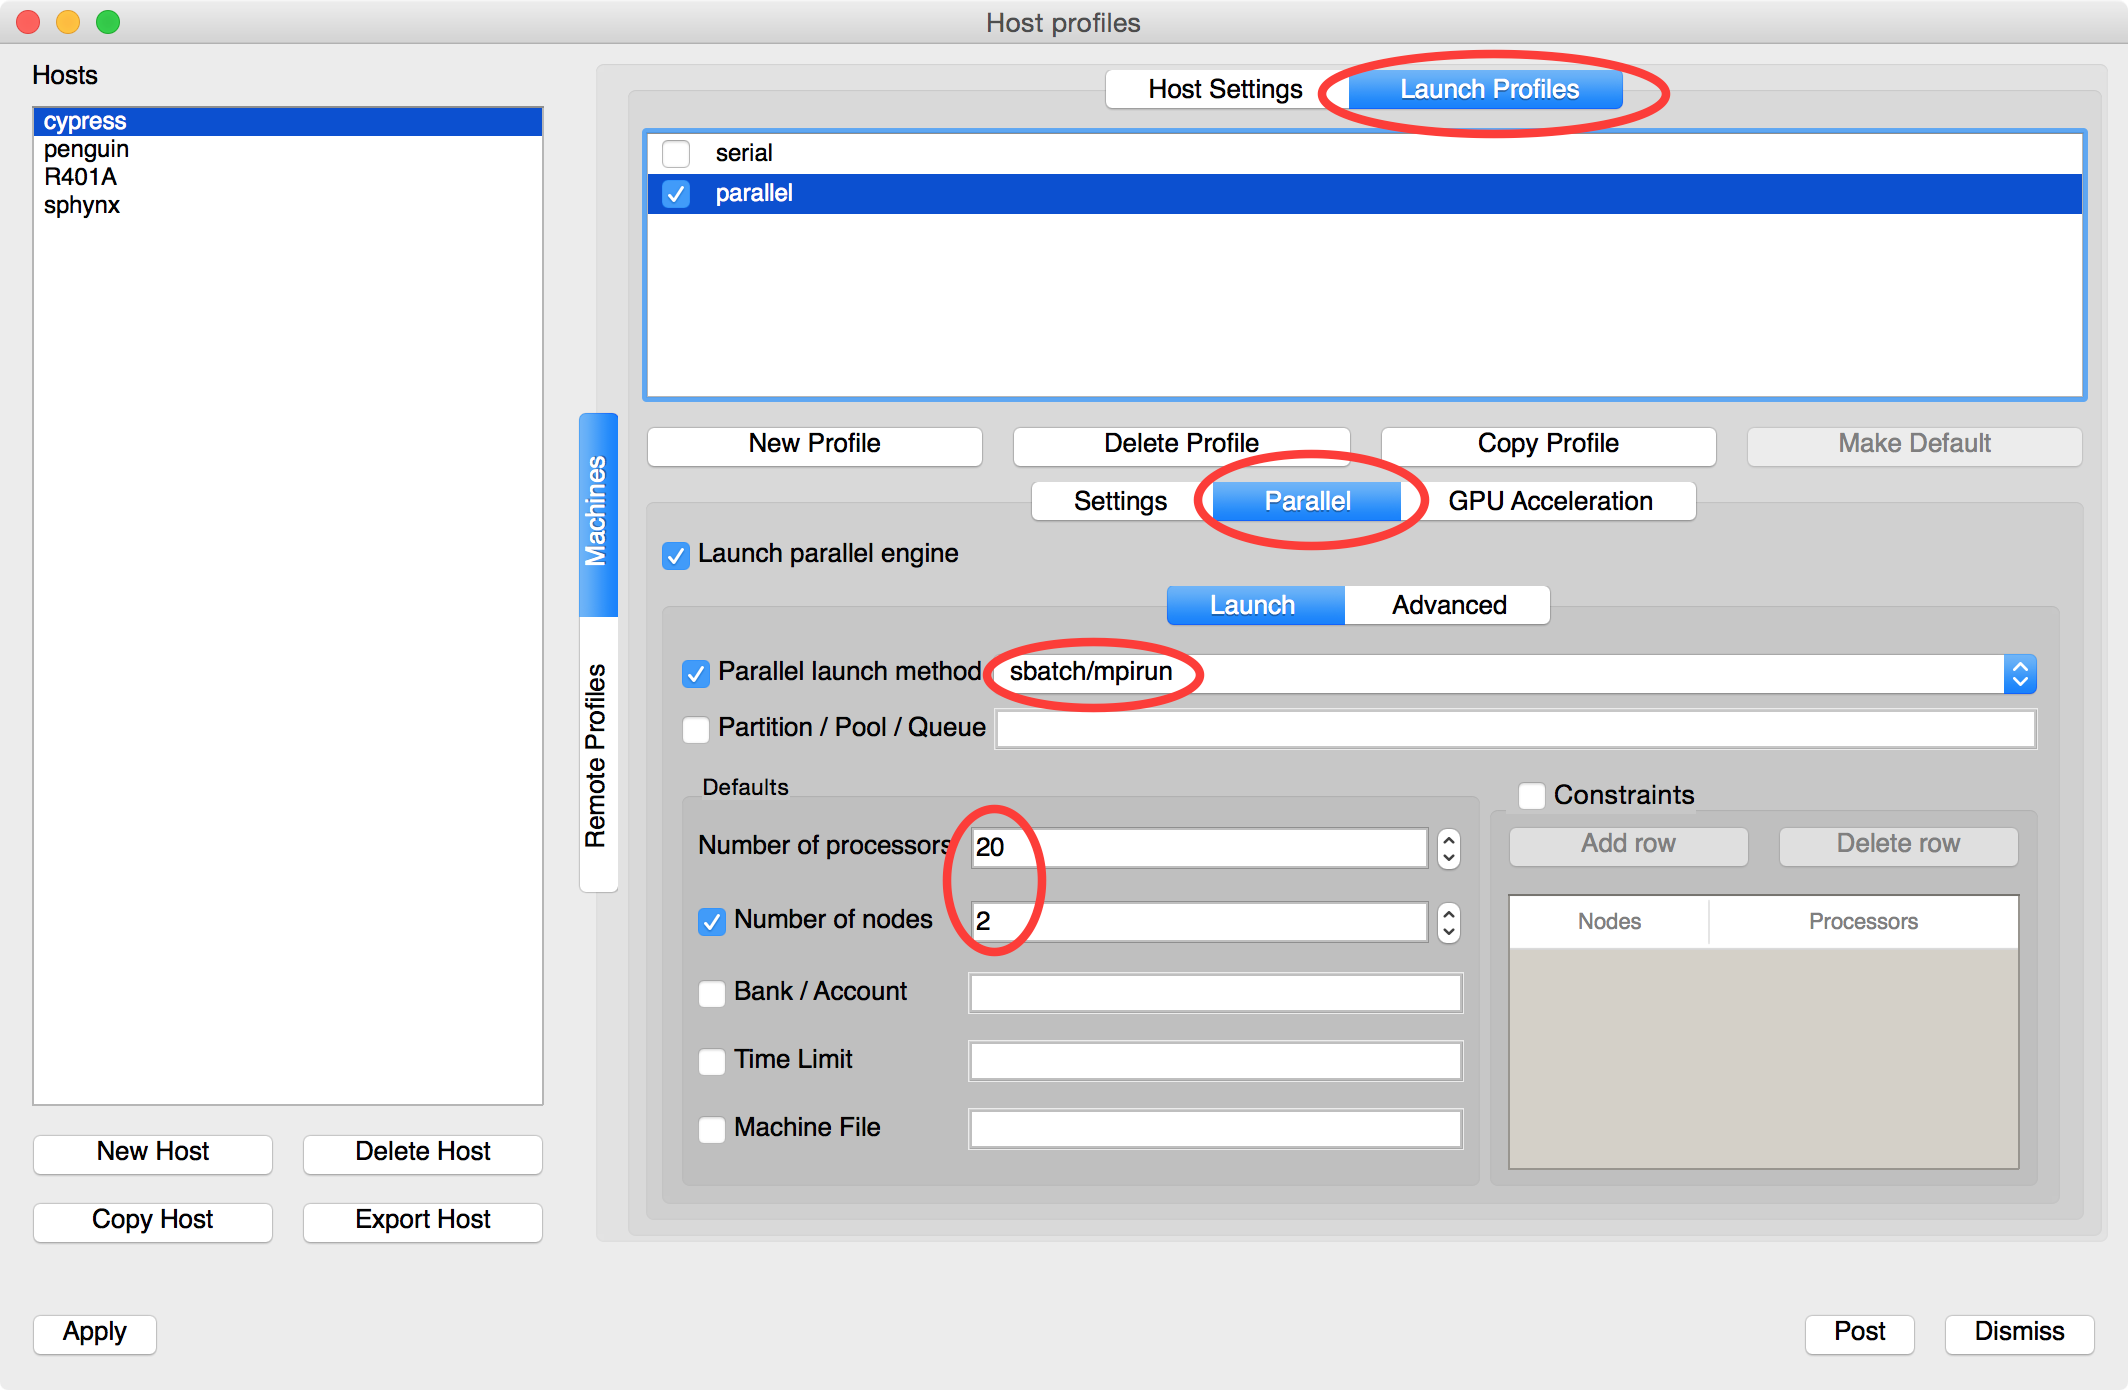
Parallel Rendering
This set up VisIt to render objects with multiple processes on multiple nodes.
- Select on [Launch Profile] tab.
- Click [New Profile] and select [Setting] tab. Give a name on Profile name.
- Select [Parallel] tab and check Launch parallel engine.
- Select [Launch] tab and set sbatch/mpirun on Parallel launch method.
- Set Number of processors, this is the total processors.
- Set Number of nodes.
- The example below sets Number of processors is 20 and Number of nodes is 2. This will use 2 nodes and 20 processes in total; 10 processes for each node.

- Select [Advanced] tab.
- Check Launcher arguments. This is the parameters for SLURM queuing system.
- In the example below, requesting 64G of RAM and 10 tasks (processes) per node.
- Check Sublauncher pre-mpi command and set module load intel-psxe/2015-update1 visit. This is important to launch MPI tasks.
- Check Launcher arguments. This is the parameters for SLURM queuing system.

- After setup, do not forget to save : Go to "Options" -> "Save Settings".
- Once setup and saved, you don't have do this again.
- To read data on cypress, "Open" and choose a Host, there must be "cypress" on the list.
- You may be asked typing password every time you read data if you haven't set up passwordless ssh login.
Attachments (6)
- ServerClientVisIt.png (22.7 KB ) - added by 11 years ago.
- StandAloneVisIt.png (19.5 KB ) - added by 11 years ago.
- VisItCypress1.png (282.9 KB ) - added by 11 years ago.
- VisItCypressParallel1.png (270.8 KB ) - added by 11 years ago.
- VisItCypressParallel2.png (257.0 KB ) - added by 11 years ago.
- VisItCypressSerial.png (261.4 KB ) - added by 11 years ago.
Download all attachments as: .zip